-
Shop Parts
- Shop Accessories
- Shop Overland
-
Shop by Vehicle
![Select Vehicle]() Select Your Vehicle
Select Your Vehicle - Videos & Resources
Sign in to my account
Digital Music Expansion Kit for Discovery Series II
Applies To:
Item: 8865
Fits: Discovery Series II | '99 - '04
Note: this kit is not recommended for use in vehicles with CD changers.
Parts included in Kit #8865:
- Exclusive Atlantic British Discovery Series II Audio Interface Box
- GripMatic™ Universal Dash Mount
- GripMatic™ Cradle
- Stereo Adapter Cable
- Nylon Ties (4)
Installation Procedure:
Audio Interface Box Interface:
1. Locate the 10 pin auxiliary audio connector underneath the passenger's seat. If you do not find this connector, you will need to install the DataLink cable (Part# LRN50530G, available from Atlantic British). (See photo 1)
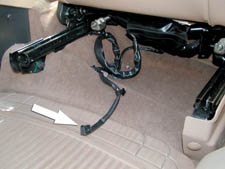
(photo 1)
2. Plug the datalink cable and the RCA plugs on the Stereo Adaptor Cable into the interface box.
3. Move the passenger seat to its farthest forward and upright position. Thread cable ties through holes on the side of interface box and mount the box below the seat by attaching box with ties around large electrical cable housing as shown (see photos 2 & 3.)

(photo 2)
Wrap ties around cable housing shown in photo 3
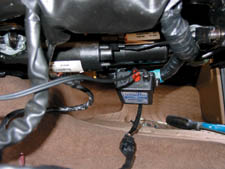
(photo 3)
4. Route the free end of the Stereo Adaptor Cable up between the seat and center console.
GripMatic Universal Dash Mount Installation:
1. Assemble the GripMatic by sliding the Vent Mount Bracket on to the back of the Cradle.
2. Choose a suitable dash vent for mounting the GripMatic Dash Mount. When mounted, the GripMatic should be within reach of the Stereo Adaptor Cable, routed in step #4 above.
3. Attach the vent mount to the vehicle vent by inserting the mounting legs onto the fin/blade of the heater vent.
4. Slide the support brace up (on the rear of the bracket) until it is in a position to hold the GripMatic at the desired angle.
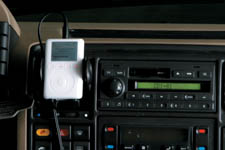
GripMatic shown installed on dash vent with digital player.
Operation:
1. Place your iPod, MP3 player, or digital music source into the GripMatic and squeeze the padded jaws together to securely hold the device (jaws release by pressing button on side).
2. Plug the Stereo Adaptor Cable into the earphone jack of your digital audio source.
3. Turn the digital audio device and the car radio on.
4. Select CD on the radio and use the controls on your digital audio device to select songs and begin listening!
What Our Customers Are Saying


